
In most circumstances I’m not a huge fan of extended body flies but where I happily make an exception and where extended bodies really excel is with flies like the Daddy Long Legs or Danica Mayfly. With those flies you’re not sacrificing hook size or performance when you have the hook shank contain just the thorax of the fly.
So assuming you want extended bodies where do you go from there? Buy in or make your own?
Here’s the tying instructions for how I make mine.
Extended fly bodies
Thread: Any slippy thread that will come off a needle easy. GSP threads like Semperfli Nano Silk, Moser Power Silk, UTC GSP and Dynema are the best for this.
Tails: (Optional depending on fly) For Danica Mayfly Moose body hair. On smaller flies scale the gauge of the tail material to suit, Sika Deer can work well.
Underbody: Dubbing, colour to suit finished fly.
Overbody: Copydex.
Rib: Tying Thread.
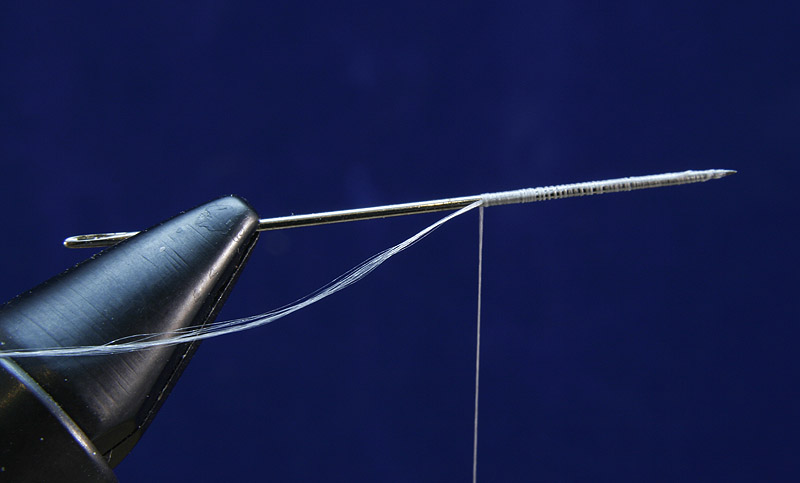
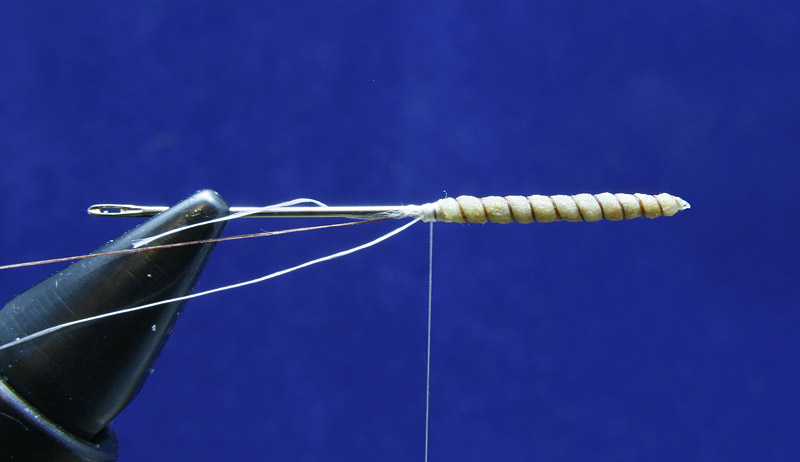
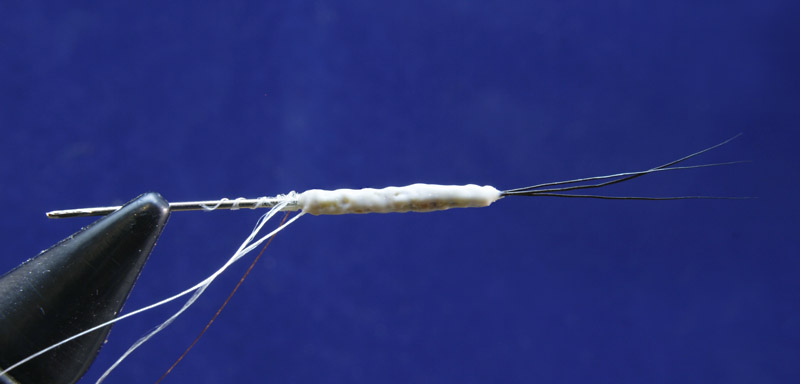
Step 1: Put a sewing needle in the vice with the point facing out. Start the thread at the point of the needle, leaving a 4 inch tag to use as the rib later, and wind the thread back the length of the fisished body. For both Daddies and Danicas I make the body around 15mm but the finished body size is your choice.
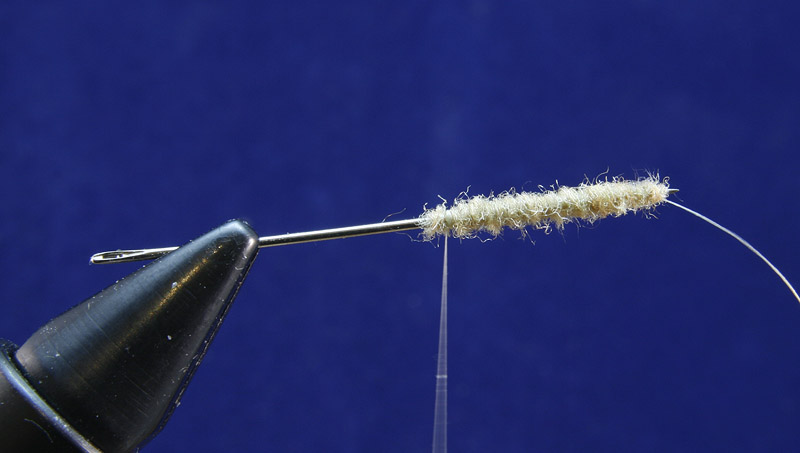
Step 2: Add dubbing to your thread and wind it down to the needle point and back up trapping down the thread rib as you go. The type of dubbing is not that important, a fine dubbing will make it a little easier to get a smooth body but if you only have the colour you want in a coarser dubbing all is not lost as you will roll it tighter at a later stage. I’ve used a mix of dyed Kapok and Antron
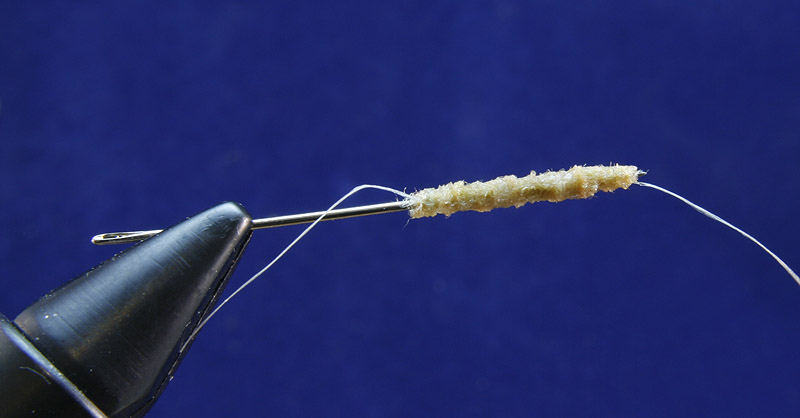
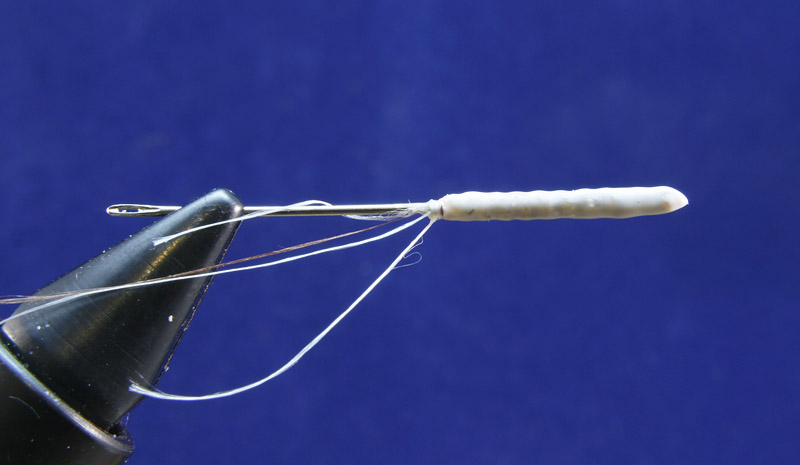
Step 3: Whip finish at the rear of the body and, using a dubbing needle, cover the body with an even layer of Copydex and don’t worry too much when the Copydex roughs up your body dubbing a little.

Step 4: Leave the Copydex until it’s almost dry, you can tell it’s ready for the next step as the milky colour will be only just gone and you can touch the body without any of the Copydex coming off on your hands.
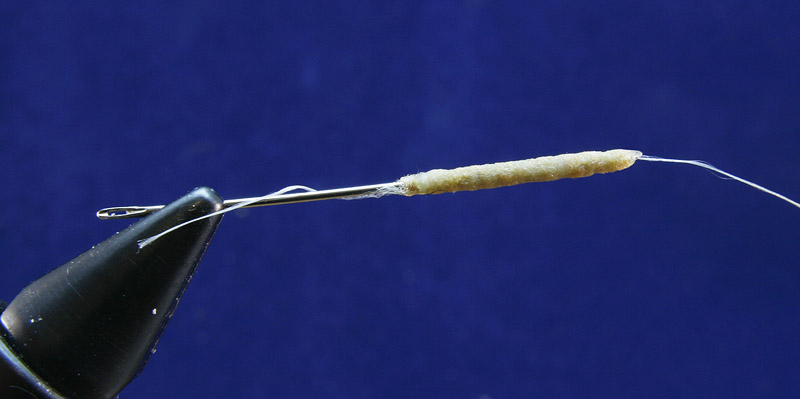
Step 5: Remove the needle from the vice and roll it tightly between your thumb and forefinger, use a lot of pressure as this is the point where you smooth out lumps and bumps in the body, you should be able to see your thumbnail and finger go white where you apply the pressure. This stage goes best if you catch the Copydex just as its cured, it still works if you leave the body too long but the result is not quite as smooth. Not a deal breaker as there is another layer of Copydex to come which smooths it out a bit more and it still works ok with a slightly bumpy body, it just looks that tiny bit better if you time it right.

Step 6: Your rolled body ready for the next step.
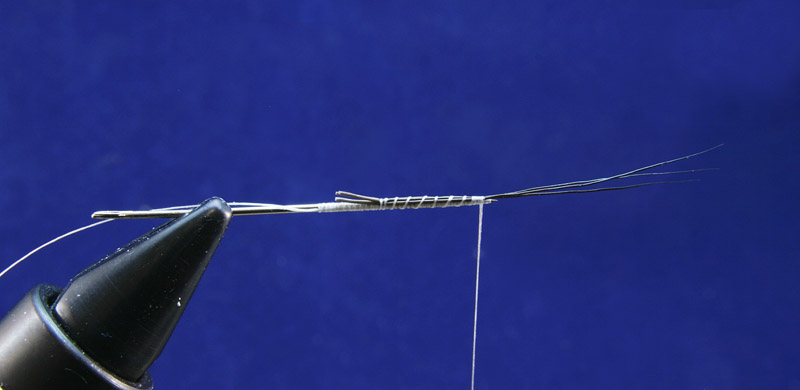
Step 7: Re-attach your thread at the vice end of the body ready to tie down the rib. Before winding up the rib I like to give it a wipe with a marker pen, even if the thread is already the correct colour for the rib, over a little time the ink from the pen leeches into the Copydex body and gives you a soft edge to your rib. This looks great on Daddies but be careful with it on Danica bodies as it may leave the body darker than you planned if the ink colour is too strong and some of the flies sit unused in the box over the season. Wind the rib up and tie off, leaving an inch long tag on all your threads to help you when it comes to attaching the finished body to a hook.
Step 8: Use your dubbing needle again to apply a final fine coat of Copydex, this coat will go on much easier than it did earlier and you’ll find you need a lot less Copydex. Don’t be overly concerned if the Copydex does not go on 100% smoothly and you have marks where the needle has been as the Copydex will self level to a degree. Put the body aside now to fully dry and it will then be ready for use.
To add tails you are basically following all the same steps but adding in tails to suit your pattern at the first step. Shown below are the differences between making the Daddy body (like above) and a Danica Mayfly or Hexagenia body.
Adding Tails: Follow step one above but add three Moose body hair tails after setting the length of the body with your first layer of thread wraps.
Continue to follow the previous steps for dubbing the body (For the Danica Mayfly I used a mix of natural and dyed yellow Kapok with a little Sand coloured Antron to make slightly darker sections a third of the way along the body), adding the Copydex and winding on the rib.
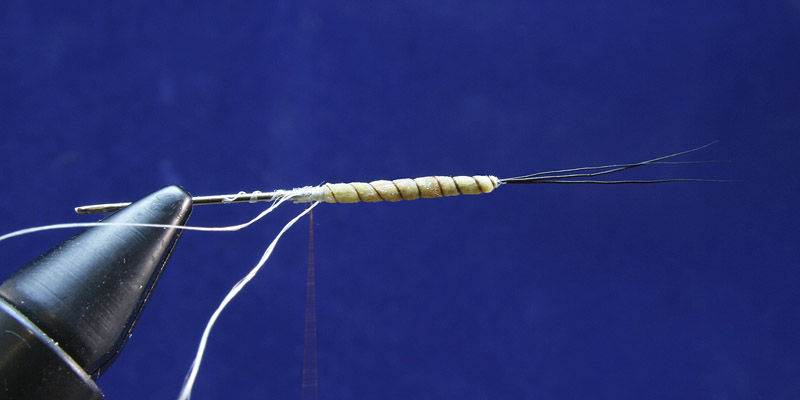
For the final layer of Copydex it’s not a big deal if you get a little Copydex at the root of the tails but make sure it won’t hold then too tightly in a bunch. You can see on this body the Copydex is not quite as smooth as I applied it to the Daddy body but as you’ll see later it levels out and shrinks a little when drying to still leave a smooth enough body.
A selection of extended fly bodies. Bottom is the Danica Mayfly body created above, to the right is the Daddy body created above, centre is a daddy body created with the C&F extended body tool and to the left a selection of pre-made shop bought bodies. My thanks to Rodgers Tackle for the pre-made bodies and the C&F tool to use for comparing body types.
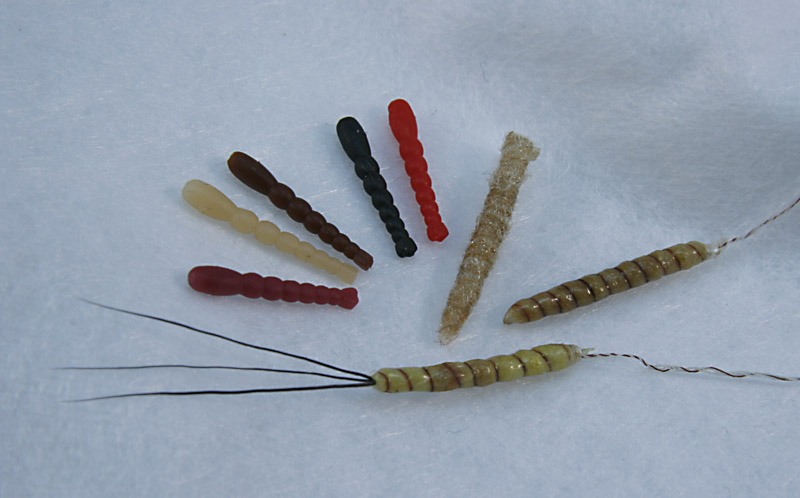
There’s a pretty wide range of pre-made extended bodies in the shops and some of them are pretty good, the ones above are made of rubber and have a nice segmented effect. You can make your own from chenille which is pretty good if you can find the colour you want, but it can be a bit soft on bigger flies and doesn’t look as good as it could when you whip tails on the end. One of my prized possessions is a Chenille bodied Daddy tied for me by Ted Malone, if he’s happy to use it for Daddies you know it’s a good material in the right hands. You can also use Deer hair which can look good and is also easier to incorporate tails, but it has the opposite problem to chenille in my opinion in that its a bit too stiff. There’s the tool from C&F which I’ve used for one of the bodies above and which, to be fair, makes good looking hollow as well as foam filled bodies and comes with instructions for adding tails but to me the bodies are not quite as durable as they could be. Don’t get me wrong the bodies are good and you can even use a dubbing needle for the same technique but I think the Copydex technique makes a better all round finished body.
Speaking of Copydex you can of course also make nice looking extended bodies using the older techniques of rolling Copydex dried on a sheet of glass or dipping a bunch of tails by the root into a tub of Copydex and repeating the step further up the body a few times when dried to give a nice taper but I found the method above gives a better finished body as well as being a little easier to do.
One final note, when making these bodies it’s much better to make them in batches of 5 or 6, as you complete one stage and leave the Copydex to dry you can tie the first stage of the next. As you work your way through the batch it’s easy to jump back and add steps to previous bodies when they’re ready for it and that way less time is wasted waiting on the Copydex to dry enough to continue with the body.
In the next blog post I’ll make completed flies from the bodies made above. If you run into any problems making these bodies yourself please contact me and I’ll try my best to steer you straight.
Superb work, as per usual!!
Cheers Stephen, glad you like it. Marc’s been giving them a go and his look really good, thats pretty cool.
excellent step by step Jim – nice photos and lighting as well 😎
Cheers Jim, photos not up to your award winning standards obviously but considering the set up I have I’m pretty happy. Need to hit you up for more advice shortly I think as I’ll need help getting better outdoor shots once the season starts. Always handy to know a photographer
I’ve tried the method and after a few I have perfected the bodies
Many thanks
Glad it was of some use to you Ronnie.